
tospace2006
New member
Hello guys, I'm not sure if non-apple product discussions are welcome here too, but I need some help fixing my motherboard on a Dell XPS 12. I have some basic repair knowledge but never done a board level repair before. It's either buy a board or try fixing this one so I thought I'd give it a try after watching Rossmann's videos. I have knowledge of electrical components but have rarely ever looked at schematics before so I'm trying to figure some stuff out.
The laptop turns on and all functions work but the SSD will not be detected and I am not able to boot into windows and only into the BIOS. Upon disassembling my laptop I found that one component has burned off my board and I am unsure of the reason. I managed to find schematics for my model and tracked down the component.
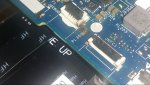
The first photo shows the burnt component PL308.
The second photo is the part on the schematic which shows that it's an inductor with the part number BLM18SG700TN1D_2P(?) and it is related to the SSD (3.3VDX_SSD) so I'm 100% sure this component is the issue.
This is the third photo after searching up the part BLM18SG700TN1D_2P I can see that it is also used on components PL302, 304, 306, and 310
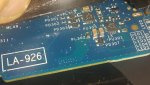
Fourth photo shows PL302 on the motherboard
I do not have a donor board but I do have lots of boards left around from iPhone repairs and etc. So, my question is, is there a way to figure out what part PL308 was, buy a new one or find similar component from another board and resolder it on my board? Is there a way to measure the value of PL302 to figure out what the component at PL308 was?
I have a HAKKO FX-888D with the original tip that came with it. Would this be sufficient to carry out this repair or will I need more tools or new tip?
I tried to attach the schematic PDF but it was too large. If it's needed to help me out I will provide it just let me know please.
The laptop turns on and all functions work but the SSD will not be detected and I am not able to boot into windows and only into the BIOS. Upon disassembling my laptop I found that one component has burned off my board and I am unsure of the reason. I managed to find schematics for my model and tracked down the component.
The first photo shows the burnt component PL308.
The second photo is the part on the schematic which shows that it's an inductor with the part number BLM18SG700TN1D_2P(?) and it is related to the SSD (3.3VDX_SSD) so I'm 100% sure this component is the issue.
This is the third photo after searching up the part BLM18SG700TN1D_2P I can see that it is also used on components PL302, 304, 306, and 310
Fourth photo shows PL302 on the motherboard
I do not have a donor board but I do have lots of boards left around from iPhone repairs and etc. So, my question is, is there a way to figure out what part PL308 was, buy a new one or find similar component from another board and resolder it on my board? Is there a way to measure the value of PL302 to figure out what the component at PL308 was?
I have a HAKKO FX-888D with the original tip that came with it. Would this be sufficient to carry out this repair or will I need more tools or new tip?
I tried to attach the schematic PDF but it was too large. If it's needed to help me out I will provide it just let me know please.
Attachments
-
 photo729.jpg372.3 KB · Views: 0
 -
 attach9295.jpg372.3 KB · Views: 0
 -
 attach9298.jpg372.3 KB · Views: 0
 -
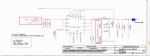 photo730.jpg72.9 KB · Views: 0
 -
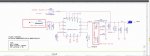 photo731.jpg65.1 KB · Views: 0
 -
 photo732.jpg113.3 KB · Views: 0
 -
 attach9299.jpg113.3 KB · Views: 0
 -
 attach9300.jpg113.3 KB · Views: 0
 -
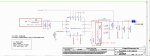 photo733.jpg73.4 KB · Views: 0
Last edited: